


")
If you are doing important work on your PC and want to save it. But you don’t know how to take a screenshot on Windows. Don’t worry, press the Windows Key + Print Screen key together to capture a screenshot. If you are using Windows 7,8,10, or 11, then there are different ways to take Screenshots on Windows. You can use any method to capture a screenshot.
How to Take a Screenshot on Windows?
If you want to know how to screenshot on Windows, here are the 4 most common methods. Depending on your needs, you can choose the method that works best for you.
Method 1: Using Windows key + Print Screen Key
This method takes a full screenshot of your PC/laptop. You need to press the Win key + PrtScr key together. A screenshot will be automatically saved on your computer. Here is how to do it:
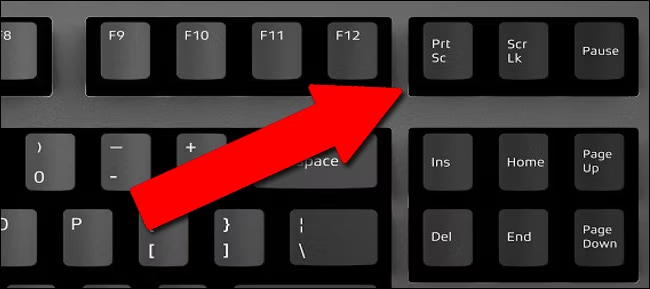
- Locate the Print Screen key
Locate the Print Screen key in the upper right corner of your keyboard. It is usually abbreviated as “PrtScr” or “PrtSc.”

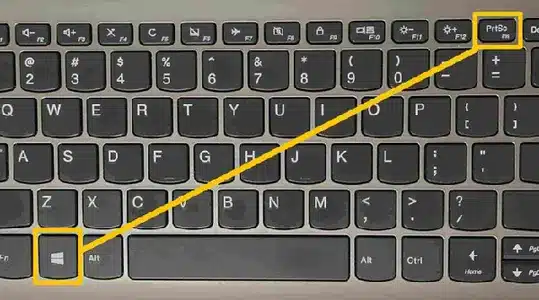
- Press the WIN key + PrtScr.
Press the Windows key + Print Screen key together to capture the entire screen.

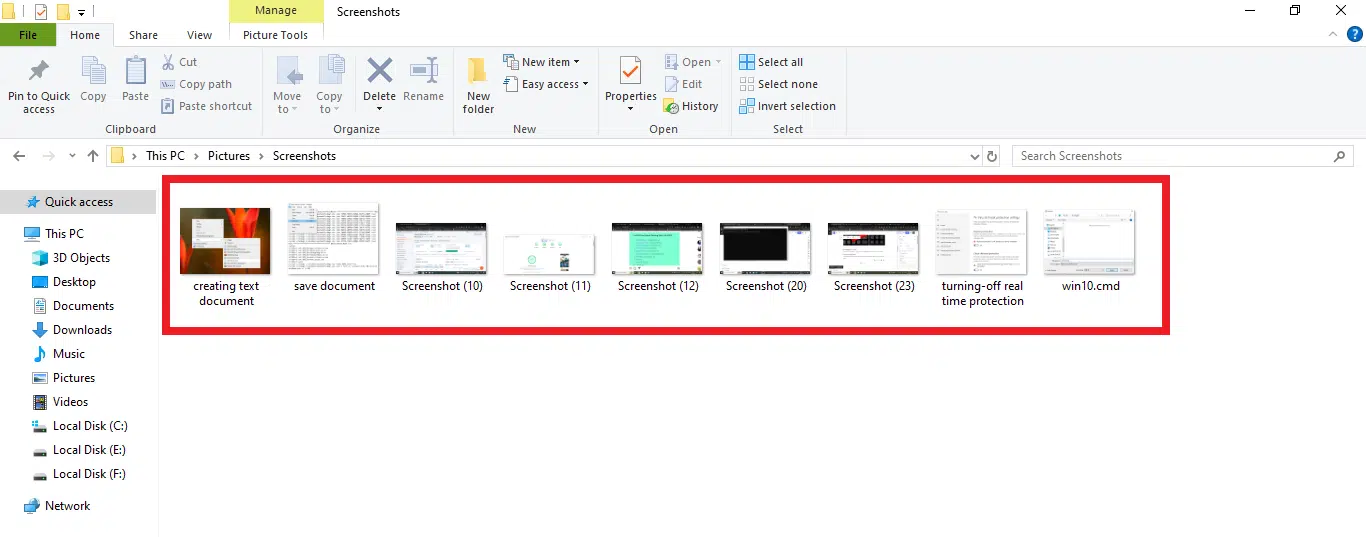
- Locate the Screenshot
This captured screenshot will be saved in the “Screenshot” folder inside your “Pictures” folder in the file manager.

Method 2: Using Snipping Tool
You can use the built-in snipping tool to capture any part of your screen. Here is how to use it:
- Type “Snipping Tool” in the Windows search bar from the bottom left corner of your PC.
- Open the “Snipping Tool” app from the search results.
- Click on New and select the Rectangle area of your screen that you want to capture.
- After that, click on “Save Snip” and save it as a JPG, PNG, or GIF.
Also Check: Use Windows+Shift+S to take a Screenshot
Method 3: Using Windows logo key + Shift + S
Microsoft added a built-in “Snip & Sketch” feature to capture a screenshot in any form. You can choose any shape to take a screenshot. Here is how to use Windows+Shift+S to take a screenshot:
- Press the Windows logo key+Shift+S on your keyboard.
- Select any Snipping Mode (Rectangular Snip, Freeform Snip, Windows Snip, and Full-Screen Snip)
- Now select the desired area to take a screenshot.
- The screenshot will automatically be copied to the clipboard, and you can paste it in Paint, Photoshop, or any other editing tool.
Method 4: Using Windows + G to take a Screenshot
If you are playing a game and want to take a screenshot, press the Win key + G. A pop-up will appear on your screen. Press the capture icon, and a screenshot will be saved on your PC.
Conclusion:
With these methods, you can easily take screenshots with just one click. It is simple and doesn’t require any additional apps. Whether you are using Windows 10 or 11, the screenshot method is the same for all Windows. If you still face any issues, comment, and I will give you a solution ASAP!

